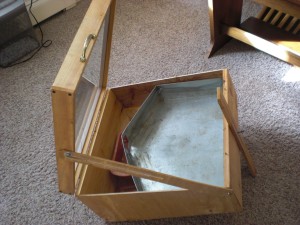
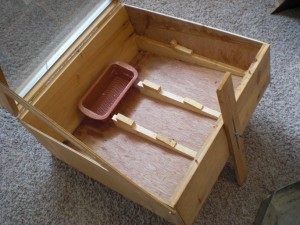
Here are some pictures and dimensions of my Solar Wax Melter. If you have looked at my page on rendering wax, you will know that I have had much better results with the solar melter than any other method I have tried.
When we built our home we had a window that was scratched, and ended up replacing it. Rather than tossing it we just kept it in the storage area. So when starting to build a solar wax melter, I started with what we had on hand. I had a two requirements when I started, 1. Had to use of the double pane window 2. The melting pan had to accommodate at least 3 deep frames. The overall outside dimensions are 22.5 inch square. The box by the support leg is 6.75 inches tall it tapers up to 9 inches where the top hinges. To hold the melting pan at the correct angle, the pan sits on some tapered pieces of wood. they start at 0.5 inch by the leg end and 2.75 inch at the drip edge of the pan. as you can see my first try was a bit shorter, and ended up putting on some small blocks to get the correct fit between the melting pan and the collection pan. Also there are some blocks, one on each side, to keep the melting pan from sliding down hill. The collection pan is a silicone bread pan. The flexibility of the pan makes getting the wax out very easy. Because the bottom of the Melter is on an angle to the floor, there are some small wedge pieces under the bread pan to hold it level. I made the leg adjustable, so the melter could be adjusted to the best sun angle. If making another, the leg length would be fixed to keep the bottom of the melter up 7 inches from the floor / ground. The sides and bottom are 0.25 inch plywood. If starting again I would line the inside with Styrofoam and paint the interior black. (I could do it now but would have to build a new melting pan a bit more narrow)
The wood holding the window is .75 inch pine by 2.25 inches tall. It has a 0.25 inch deep dado cut in the inner edge to keep the glass retained. If starting from scratch, I would find some clear green house double layered Plexiglas with dividers. This would lighten the melter and reduce the chance for breakage.
The Melting pan is 4 inches tall, 21.75 inches wide at the leg side. The sides are 12 inches, and the front tapers to 16.75 from the back edge to where the wax drips out. I put in some aluminum screen wire across the bottom of the melt pan and up the edge where the wax runs out of the pan. This keeps the wax from melting and sliding down and plugging up the outlet. If you want to clarify the wax at the same time you are melting it, place a couple of paper towels on top of the screen wire, and as it melts it is also filtered in one step. I’m trying something new,,, instead of using paper towel to filter the wax, I have put in a piece of polyester fabric, it will be reusable. Hopefully it will be easy to clean by putting it in the freezer, then bending it to chip off the slum-gum, Early test show that the slum-gum will come up if removed warm. With some practice you can almost tell how much wax to put in the melting pan to fill the collection pan. If you over do it, (as long as you are keeping an eye on it) if the collection pan starts to fill to overflowing, just prop the lid open. That will stop the melting process. leave everything sit till the wax cools. If you move it while the wax is still molten, it will spill… ask me how I know. Lastly there is a support to keep the top open, my first thought was a chain. but then it would have to be over center to keep it open, and would make the whole thing unstable when open.
The easy part is you can toss in a pan of wax, park it in the sun in the morning, and just about sun down you can go out and take out a block of nice filtered wax. Think Candles, Lip Balm, Hand lotion etc. If it is capping wax with a bit of honey in it. You will have a block of wax floating on top of some darkened honey that you can use for cooking, BBQ sauce, making candy, or baking, just use your imagination.
If anyone wants more detail. let me know.


